Vaping is a transition to a life without tobacco and then without addiction.
By entering this site you accept our legal notices

Looking after your e-cigarette properly isn't complicated in itself, and it guarantees good performance and a longer lifespan for your vaping kit.
.jpg)
Contact with your mouth, the atomiser overheating, leftover flavourings and e-liquid residue, dust… all of this gradually takes its toll on your beloved e-cig. Generally speaking, under what we might call normal use, it's always the same parts of the e-cigarette that need keeping an eye on, cleaning, or even replacing. These are:
- The drip-tip
- The tank
- The atomiser connection
- The battery or mod connection
- The coil head
- The coil
- The battery
The Classic Tools for Cleaning Your E-Cigarette
.jpg)
A simple rinse under clean water is, more often than not, all you need. But when you've built up grime stuck to the drip-tip, stubborn lingering smells from e-liquid in the Pyrex tank, or traces of flavourings and vegetable glycerine stuck to the build deck, it's time to bring out the big guns.
.jpg)
On the right, the LPV team's competition tray (well used!)
For all atomiser parts (with the obvious exception of pre-built coils and any electronic components), the ideal solution is an ultrasonic cleaner. Used by opticians and watchmakers alike, this device sends out tiny bubbles that lift residue out of nooks and crannies that are impossible to clean by hand. It's really handy, since every part, including the seals, can go straight in. The downside is that it's a fairly significant investment.
An alternative solution is to soak your kit in a mixture of white vinegar and bicarbonate of soda. The resulting fizzing action works pretty well at stripping away grime. A thorough rinse under clean water afterwards is essential, though.
Cleaning with regular washing-up liquid is fine too, but again, rinsing thoroughly afterwards is just as important. Let's not forget that a clearomiser is, after all, something you put to your mouth.
.jpg)
A man's two best friends?
Every vaper's best friend is the humble paper towel, the divine kitchen roll. Without it, we'd be lost. That said, there's a cheaper, more eco-friendly solution out there: air! Letting your kit air-dry costs nothing at all, provided you've got plenty of patience. That said, paper towels, or an old cloth, will inevitably leave a few fibres behind on your kit, unlike microfibre cloths.
.jpg)
An old toothbrush and a bottle brush! Don't throw your old toothbrushes away! Small bottle brushes also come in handy for scrubbing out tanks and drip-tips.
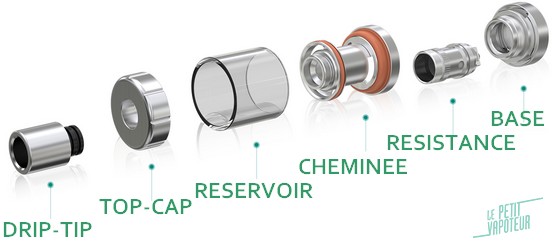
Looking After Your Clearomiser Properly
.jpg)
- The drip-tip
Logically enough, this is the part of the atomiser that gets dirty the fastest. Dead skin, saliva, e-liquid condensation, it's a real hotspot for bacteria. A simple rinse under clean water usually isn't enough. A good scrub is often called for, and for the more hygiene-conscious among us, a soak in bicarbonate of soda and white vinegar can do the trick nicely, followed, of course, by a thorough rinse.
.jpg)
- The tank
Clearomisers are generally made from glass and stainless steel, so there's nothing to worry about when giving them a proper clean. A good clearomiser should come apart and go back together without any trouble. The only precaution worth taking is not to lose the seals, and to make sure you remember exactly where each seal originally sat.
While we're at it, it's worth checking the condition of these seals, since they're the parts that take the most punishment. Regularly squashed and compressed, they're what keeps the clearomiser properly sealed. Worth noting that not all these rubber seals are created equal, with some brands offering noticeably lower quality than others. If your clearomiser starts leaking, this is one of the very first things to check, which is exactly why spare seals are always sold separately.
.jpg)
These days, the membranes and silicone plugs found under sliding top-caps are also sensitive parts worth checking over.
For clearomisers, a good rinse is usually all that's needed in most cases. A tank that still smells (purely as an example, of course) like Red Astaire even after cleaning will need a more thorough clean: washing-up liquid, a bicarbonate solution, and so on.
Finally, to help prevent drops in the first place, vape bands are genuinely useful for protecting your pyrex glass.
.jpg)
Coils that have reached the end of their life!
Cleaning Coils
As for clearomiser coils, these simply can't be cleaned. The days of (more or less) washable wicks, like those found on the Stardust or Ego C, are well and truly behind us now. For one thing, it's pointless, and for another, the coil itself can end up damaged. Indeed, rinsing a pre-built coil completely waterlogs the cotton fibre, and flavour suffers as a result. Worse still, the fibre can shift out of place and lose contact with the resistance wire altogether, which is a guaranteed recipe for a burnt taste.
That said, to help extend the life of both your coil and your clearomiser, it's best never to store a clearomiser with e-liquid left sitting in the tank. Indeed, certain e-liquid flavourings age very badly, leaving stains and an opaque residue on your kit.
.jpg)
Cleaning Rebuildable Atomisers
Rebuildable atomisers need the same general care as clearomisers, since they serve the same purpose, but with the added complication of the build deck, plus the coils themselves. The build deck is the part of a rebuildable that goes through the most temperature swings, sometimes pretty extreme ones. This is also where you'll be able to tell whether an atomiser is well made or not, based on how well the metal used by the manufacturer holds up.
Just like clearomisers, rebuildable atomisers can be fully taken apart. Smaller parts can be scrubbed more carefully using an old toothbrush. Avoid chemical products on any parts that come into contact with e-liquid (the deck, the atomisation chamber, the chimney, and so on). Some vapers actually use toothpaste to scrub these parts!
For build decks, and coils too, a small wire brush comes in genuinely handy for scrubbing the steel and clearing out any "grime" stuck between the strands of wire. This needs to be done carefully with coils, though, so as not to deform them.
As we covered in a previous article, it's best to avoid dry burning your coil (heating it up bare) wherever possible, for health reasons, as dry burns can release unwanted metal particles. That said, you can speed up drying your coils after a rinse by firing the mod a few times in short pulses. As long as the coil doesn't glow red, you're fine.
.jpg)
A dirty box, now out of action
Cleaning Batteries and Electronic Mods
The most sensitive areas here are the atomiser connection and the micro-USB port. Not every atomiser is 100% leak-proof, and even taking good care of your kit, drips of e-liquid will often seep down towards the mod or battery's 510 connection. This is a recurring issue, and it's the point where you really need to be diligent: wipe this connection down regularly. Paper towel to the rescue, once again! Otherwise, that drop of liquid ends up landing on the electronic circuitry, which is never good news. Take care, too, not to force the connector pin, which needs to stay in contact with the atomiser.
Another sensitive spot: a micro-USB port clogged with dust, which can stop charging altogether or even break. A good blow is often enough here, or you could use a small, clean brush.
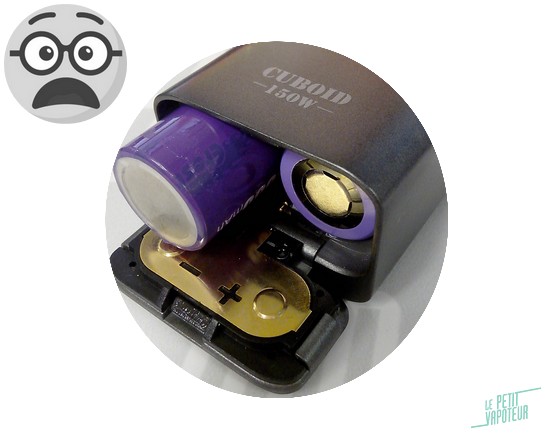
The Hinge Problem
This isn't talked about much, but battery doors on mods giving way is, unfortunately, a real issue. Batteries ending up on the floor is something many of us have experienced firsthand. And sadly, there's not a great deal you can do about it, other than handling your box's hinges with care.
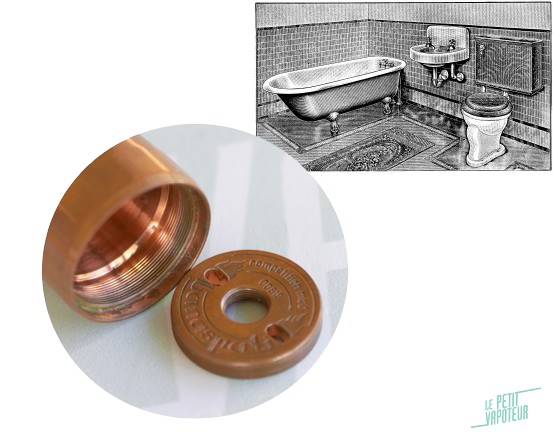
Cleaning Mech Mods
With a mech mod, there's no electronics to worry about, so you can really go to town giving your mod a good polish, almost like polishing your grandmother's silverware. On a tube mod, it's the threading that needs the most TLC, along with the switch. Microfibre cloths work really well here.
For copper mods, some vapers polish their tubes using alternative, chemical-free methods: toothpaste, for instance, and I've even seen one vaper using ketchup!
Some vapers use copper grease to maintain the threading on their precious mech mods. I couldn't say whether it's actually effective, never having tried it myself, but I do know it's entirely pointless on titanium mods. Titanium and copper particles really don't get along.
.jpg)
Batteries ready for a re-wrap
Battery Maintenance
Let's finish with the trickiest topic of all: batteries. Batteries really do have a hard life with vapers. Carted around everywhere, sometimes poorly charged, occasionally soaked in e-liquid (see the issue mentioned earlier), not to mention batteries getting stuck inside the mod. In short, there aren't many ways around it: wraps, cases and silicone sleeves are absolutely essential.
It's worth repeating once again: nothing beats a proper battery charger for charging your batteries. True enough, but it's often these very chargers that end up damaging the battery wraps, thanks to slot springs that are sometimes far too stiff and suddenly snap back onto the battery, and your fingers along with it. So do be careful…
.jpg)
Wraps don't cost a fortune, thankfully, so it's worth stocking up on plenty, since they too will eventually fall victim to nicks and e-liquid seepage. So should you replace a wrap that's been affected by leaking e-liquid? If that's the case, the battery itself may already be showing signs of corrosion. Simply wipe the battery down (kitchen roll, naturally!) to check its condition. Even the slightest trace of rust can potentially compromise its integrity, in which case recycling is the only sensible next step for that battery. If the surface of the battery still looks intact, though, all you'll need to do is fit a fresh wrap.
.jpg)
For peace of mind while vaping…
And what about knocks and drops affecting a battery? These things happen. Whether it's a minor bump or a bigger impact, even the smallest dent on the outside of a battery can have consequences on the inside, consequences that can even pose a genuine safety risk. A dented battery should therefore go straight for recycling, no exceptions. Cover the terminals with tape before placing the battery in the appropriate recycling container, just to be safe, as the last thing you want is to cause sparks inside that container.

Pascal
Best blog articles
Use correctly the coil for your Electronic Cigarette
 Le Petit Vapoteur


- Guides choose fabricate Learn more Withdrawal Vaping glossary
-
Tools
ecigarettes
eliquids
Experts
diy
-
Blog
Latest blog posts
-
Mastering your coil builds: everything you need to know about building your own
02/27/2026

-
Watts, What Are They For?
02/13/2026

-
On the Use of Alcohol in E-Liquids
02/6/2026

-
Article 23: The Successful Mobilisation of Vapers
02/3/2026

-
Mastering your coil builds: everything you need to know about building your own
02/27/2026
- Shipping details
- PRO


 Age verification
